
Learning how to create an email list is essential because the marketing landscape today is largely digital and as a business owner, it is of absolute importance that you join the digital bandwagon if you want to grow and succeed in business.
For a lot of people, digital marketing revolves around brand awareness and marketing campaigns on social media channels.
Sure, social media is an important aspect of digital marketing but the problem here is that with social media, you don’t own your accounts. You just manage the content on your account.
And as it often is with social media accounts, it could be suspended, hacked or blocked.
Point is, with social media, nothing is truly yours and in the event that anything goes wrong with your account, regardless of how large a following you had built or how active your account had been, once it’s gone, it’s gone.
That is why as a business owner, you need to build and develop a medium through which you can reach your customers and target audience without total reliance on any social media platform.
This is where email comes in.
Did you know that there are currently about 3 billion email users in the world? In addition to its gigantic user base, email marketing has been proven to be the most powerful, profitable, and effective digital marketing tool with a rapid user adoption rate.
As such, it goes without saying that as an online entrepreneur, if you are going to work with any digital marketing strategy for your business, then it should be email marketing.
However, before you proceed with your email marketing tactics, it is necessary to create and build an email list first.
An email list is simply the list of people subscribed to your newsletter.
You have their email addresses and you can send them email updates on new products and services, promotions, offers, and other notifications.
But growing your mailing list can be difficult, especially if you don’t know how to build up on your subscribers in a fast and efficient manner.
Fortunately for you, I’m here to help.
Below, you will find the steps on how to create an email list from scratch and ways you can grow your mailing list in order to help you set your business on the right path.
- Get an autoresponder
Have you ever sent a mail or subscribed to an email newsletter and gotten an (automated) email response/feedback almost immediately regardless of the time of the day?.
Obviously, the business owner or digital marketer is not the one sending out those feedbacks, that is the job of a software known as an email autoresponder.
The autoresponder like the name implies is a software designed to send emails to your subscribers automatically and if you want to create an email list, you will need one.
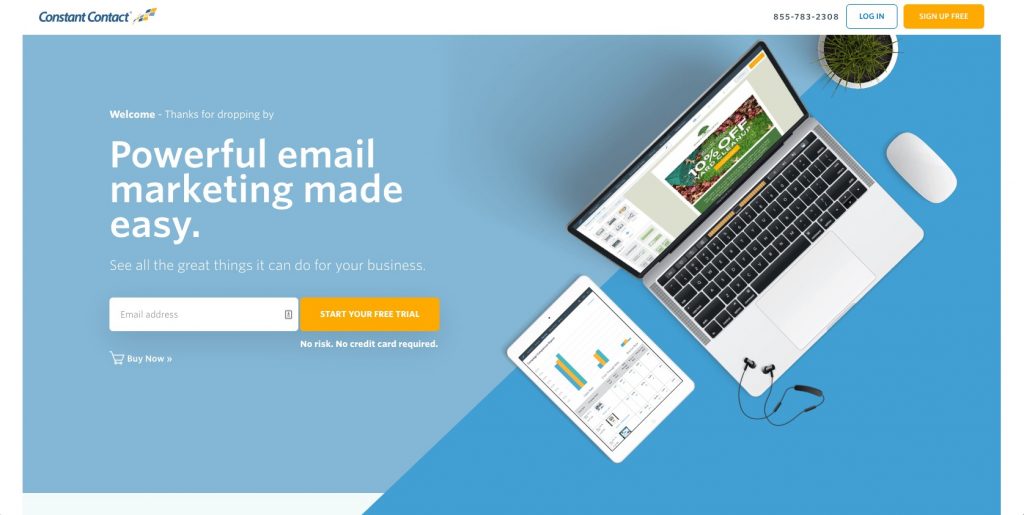
Some of the widely used autoresponders in the industry include Constant Contact, GetResponse, and MailChimp.
Disclosure: I’m an affiliate and earn a commission from Constant Contact if you make a purchase through my link. Thank you.
These applications can allow you to create and customize your email sign up form and provide you with a URL that you can embed in your blog or website, share to social media, and other channels where your target audience is likely to be.
Once you integrate an autoresponder in your email marketing, it becomes a lot easier to manage your email list and stay connected to them. In this post, we will be discussing how to create an email list using Constant Contact and GetResponse autoresponders.
How to Create an Email List Step-by-Step Using Constant Contact
Constant Contact is a great email autoresponder that can help you create and maintain an email list. In 2019, it was rated the best email marketing platform by WPBeginner, thanks to its excellent customer support, ease of use, and powerful tools.
However, creating an email list with it is quite simple, even if you are with no prior experience. When you decide to choose Constant Contact, all you need to do is create a profile, add contacts, and create an email campaign to get going.
1. Create a profile with Constant Contact
This is the first part if you want to create an email list with Constant Contact.
To do this, follow the steps below.
Step 1: Sign up with Constant Contact
To get access to Constant Contact’s amazing features, you need to sign up with Constant Contact. To do this, click here and register to enjoy a 60-day free trial.
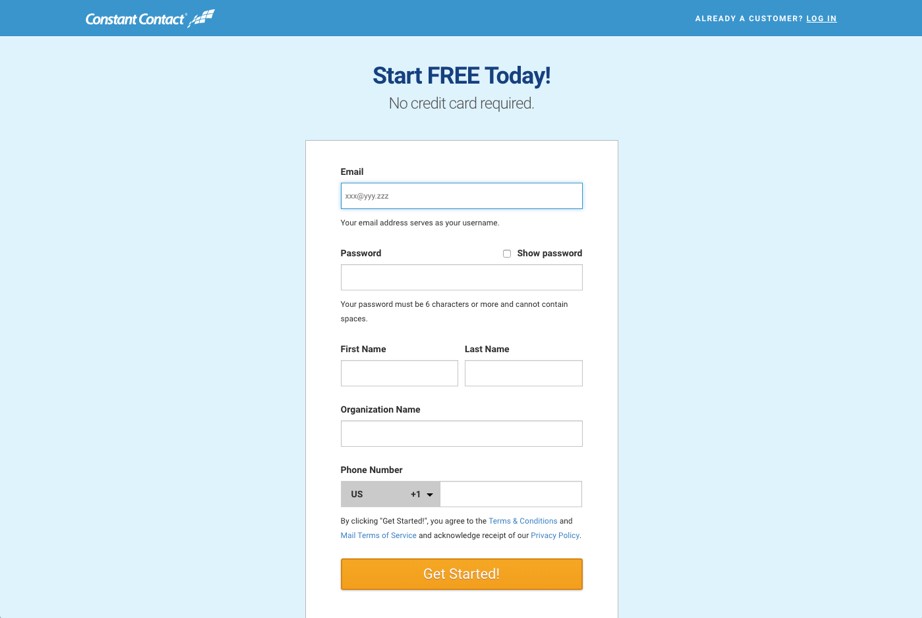
Afterward, you’ll need to subscribe to any of its plans. Note, you can either subscribe to its email plan, which starts at $20/month or its Email Plus plan, starting at $45/month.
If you want to save money, you can also make a six- or twelve-months advance payment. With that, you can get up to a 15% discount from the actual cost price.
Step 2: Log in to your Constant Contact account
Next, you need to log in to your newly created account. Enter your login credentials and click login on the page. When you do, you’ll arrive at the home page of your account.
Step 3: Edit your profile details
You need to automate the features that appear inside your emails. As such, click on “My Settings” in the top right corner of your homepage.
Then, under the Manage tab, you can edit your organization name, logo, phone number, website, and privacy policy.
You can also edit your profile to identify yourself so your readers can know who is trying to get across to them. To do this, fill in the “From Name” field with your preferred name. Note, this is who will appear to have sent the mail.
You can either turn on or turn off the “Permission Reminder” segment. And it helps you include a short message at the top of the mail.
Although this is optional, we recommend you turn it on as it can be useful. You can utilize it to call for action or remind your readers of the importance of your e-letters.
2. Create a contact list
Next, you need to add a list of contacts to Constant Contact. These are the people who will be the recipients of your future email campaign. Note, you can add them through three methods.
- First, you can copy then paste them into Constant Contact. To do this, navigate to “Contacts,” then “Add Contacts” and select whether you’ll use individual input or group input.
- You can also import the contacts from a spreadsheet. Usually, Constant Contact is compatible with XLS, .CSV, .VCF, .TXT, and .XLSX. Also, to avoid errors, you should format the sheet and ensure the email addresses are in a column while other information in a separate column.
- Finally, you can integrate with a compatible third-party application such as Gmail, MailChimp, and Microsoft Outlook. And to do this, click on the Integrations tab then follow the guide there. Also, note that you need customer’s consent to add them to your list as Constant Contact is permission-based.
3. Create an email for your marketing campaign
After arriving at your homepage, you need to begin an email campaign on Constant Contact.
To do this, follow the steps below.
Step 1: Create a campaign
Navigate to the top of your page and click on “Email Marketing.” Afterward, a tab should pop up. Click “Create” on the tab to get started.
Step 2: Define your email campaign
You need to define the particular email campaign to get going. Select a name and enter it in the “Email name” field.
Don’t worry; your recipients won’t see it as you decide what they can see later. Instead, it is to enable you to identify a particular campaign effectively.
So, pick any descriptive title or the date of creation to identify it. Then click “Next.”
Step 3: Design a template
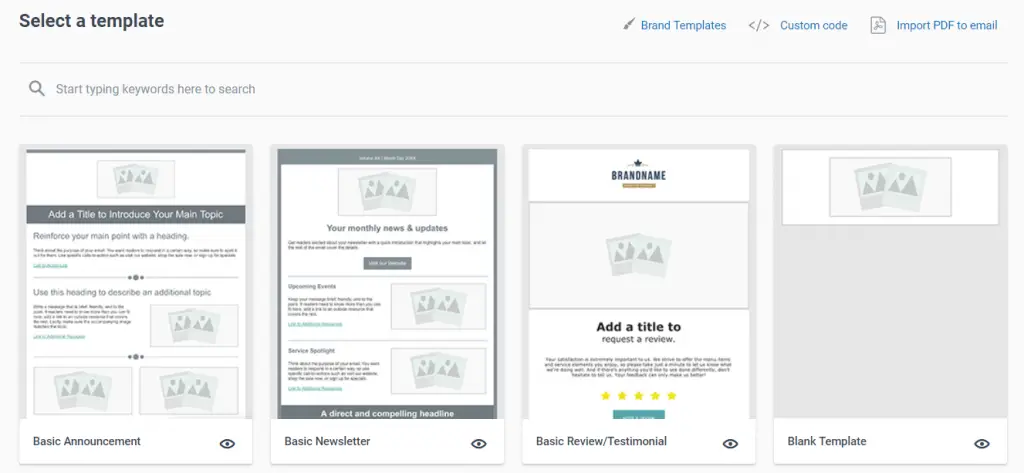
Now you need to pick a template that will appear before your visitors. To do this, you have three choices.
First, Constant Contact comes with some inbuilt templates. You can quickly scan through its directory and pick any model of your choice.
Constant Contact also allows you to access these templates by their category. Simply navigate to the left-hand side of your page and click the category links.
Second, you can customize your template and upload it to Constant Contact. All you need to do is click on “Use My Own Code” located around the left part of your screen and follow the instructions.
Although not all formats are supported, Constant Contact supports XHTML and HTML.
Thirdly, you can request that Constant Contact design a custom template for you. Click on “Let us create it!” It should take around four weeks to get your model ready.
So, if you’re short for time, you might want to consider any of the two options above. Also, it’s is not free, and you’ll be charged based on your template request.
After picking the template of your choice, click “Next.”
Step 4: Select a subject line
Now, this is the stage where you decide what your readers can see as the subject of your mails. Pick a theme that best describes the purpose of your email. Navigate to the upper-right part of your screen to do this.
Step 5: Enable a webpage form of your email
Again, while this is optional, we recommend that you turn it on by ticking the checkbox. This ensures your readers who can’t access your emails in the mobile format can view it through a webpage version.
If you tick it, once you send a mail, it creates a webpage version automatically. And this version remains active for 30 days.
Step 6: Enter “From Email Address” and “Reply Email Address”
Also, you can include the “From Email Address” and “Reply Email Address.” The input in the from address will appear as the sender of the mail while the reply address will receive replies from your readers. Click on the drop-down menus to do this.
You can also include and verify additional email addresses for your use. All you need to do is click “Verify More Email Addresses” under the drop-down menus.
Again, ensure you use a private email address, so your emails don’t keep going into the spam folder of your recipient.
Step 7: Enable “Forward Email to a Friend”
Next, underneath the Forward Email to a Friend tab, tick the box “Forward Email” so you can forward the link directly to your mail. Also, in the sent email, tick “Subscribe me!” After, click “Next” to save your inputs.
Step 8: Edit and rearrange your email
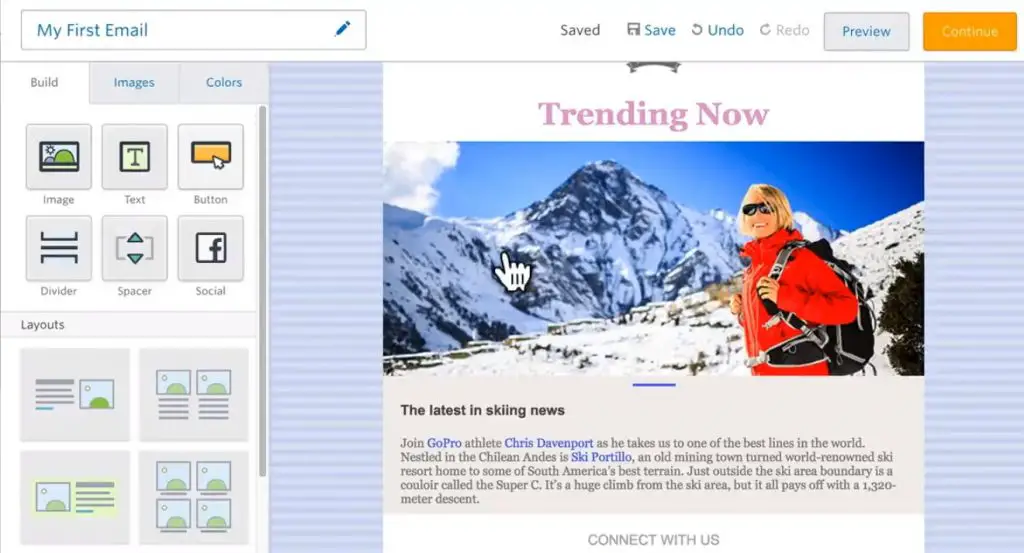
Now, you can edit your mail to suit your preference. You can change the fonts and colors by clicking the “Global Colors & Fonts” tab by the left. You can also use the “Advanced Features” tab to edit the text version and style sheet.
You can also rearrange block – headings or sections – to your preference. You can copy, delete, or edit the text of the block to suit your needs. Once you finish, click “Save & Continue.”
Step 9: Pick a contact list
You need to pick a contact list that’ll receive the email. Now, click on any of the contact list created above by ticking its checkbox.
This way, all the contact on the list will receive the email. You can also tick more than one contact list. Afterward, click “Next.”
Step 10: Finalize the mails
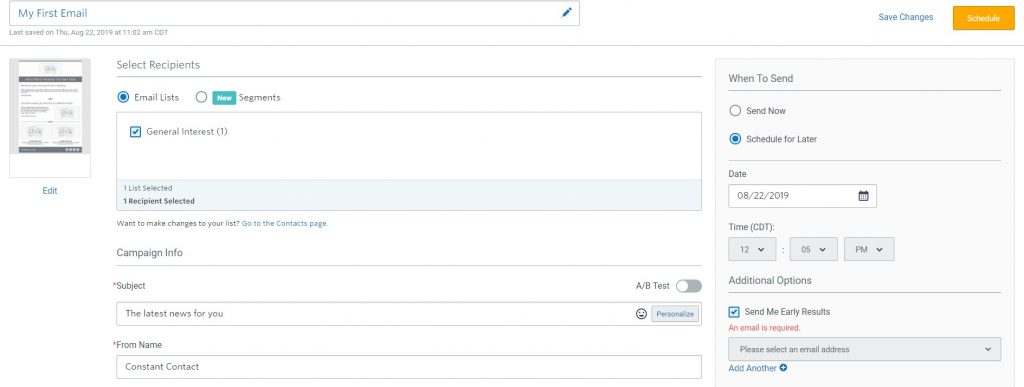
You can either decide to share the mail immediately or schedule the e-letter for later delivery. If you choose to send later, you need to input the specific time and date that you want. Afterward, you can click “Finish.”
Note, you can also access stats about the effectiveness of your marketing campaign. All you need to do is click on the “Reporting” menu on your homepage. You can then select the specific campaign and see how well you’re doing
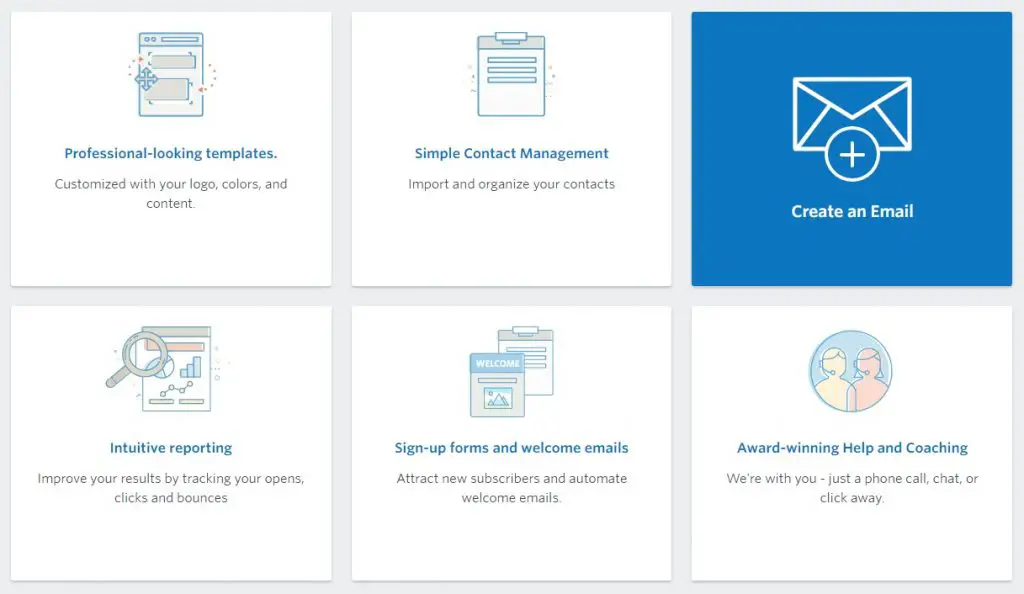
Benefits and Tools Offered by Constant Contact
Although these steps seem quite long, it’s worth it as joining Constant Contact comes with cools perks and tools. They include:
1. Free trial
Constant Contact offers you a free trial – 60 days – when you sign up. You don’t need to pay a dime or input your credit card details as long as you’re from the US or Canada.
This way, you can see first-hand just how much value Constant Contact offers to your marketing campaign.
2. Excellent customer support
One of the benefits of choosing Constant Contact is access to award-winning and superior customer support.
For instance, upon signing up for your free trial, Constant Contacts helps you navigate through the platform either through an email or a phone call.
Also, it provides fast and detailed answers to whatever questions you might have on how to maximize the platform and its features.
3. Fantastic and flexible templates
Yes, with Constant Contact, you also get access to more than 100 mobile receptive models. Even more, there’s also a feature that allows you to “Brand Your Email.”
With it, you can personalize your template to reflect the colors and images of your site. And all this in seconds.
4.Compatibility with various email types
A great advantage of choosing Constant Contact is that you can apply it to practically most email types. This wide range of email types includes recurring newsletters, event registrations, A/B testing, classic, coupons, basic automation and autoresponders, polls, and surveys.
5. Email automation
Apart from this wide range of email types, Constant Contact also provides you with an excellent automation service. It includes automation from contact triggers such as clicks and email opens.
You also get access to abandoned cart campaigns such as WooCommerce and Shopify and autoresponders.
6. List management
If you’re worried about an extensive list of contacts cut across different categories, Constant Contact got you covered. It allows you to categorize and segment your contacts with tags, even on a targeted email list. This way, you can effectively target your email campaigns.
7. Quick list building
Another advantage of choosing Constant Contact is getting access to a vast array of list building tools. It allows you to integrate a sign-up sheet on your website.
You also get access to a Facebook app that will enable people to join using an email opt-in sheet.
Even more, it supports text-to-join functions, and you can always add new contacts at in-person programs using your tablet.
8. Design testing
Errors in your mails can be a total turn off for your readers and, as such, ruin your campaign. Luckily, Constant Contact also allows you to avoid it.
It has a tool that will enable you to preview your emails in mobile and desktop versions and even for a specific recipient.
Even more, there’s a feature that allows you to check for errors in the mail. This way, you can avoid grammatical mistakes in your campaign and present a flawless message to your readers.
9. Lead Ads
You’re also allowed to lead ads when you choose Constant Contact. It supports Instagram, Google, and Facebook lead Ads.
10. Applications and Integrations
Another excellent benefit that Constant Contact offers is compatibility and integration with a wide range of apps and platforms.
It is compatible with popular platforms like Shopify, Eventbrite, Outlook Desktop, Office 365, BigCommerce, WooCommerce, Google, WordPress Plugin, Quickbooks Online app, Facebook, and Salesforce by Cazoomi.
Even more, it provides the Constant Contact mobile application that enables easy and fast mobile email marketing. There’s also a ListBuilder App, so you can easily engage in tablet sign up. There’s also a banner that you can add to your resource page.
11. Report and Analysis
Another fantastic benefit – perhaps the best – that Constant Contact guarantees are access to a standard and comprehensive summary of your campaign activities. It allows you to track bounce, click, standard open, unsubscribe, and spam rates.
Also, you get access to more in-depth analysis such as click heat maps, open click lines, opens by device, and most compelling subject lines. You can also compare campaigns, so you know what’s working and how to apply it.
How To Create An Email List Step-By-Step Using GetResponse
Once you have chosen to use GetResponse as your email autoresponder, to create your email list, you will need to;
Sign up for an account on GetResponse.
All new members on GetResponse are given a 30-day free trial where you get to use the services for free after which you can decide to subscribe.
Next, log in to your account. GetResponse will automatically create your first mailing list for you. You can view this by clicking the “List” button at the top left-hand corner of the screen.
To create your own first list, click on the “Create List” button and you will see a page like the one below.
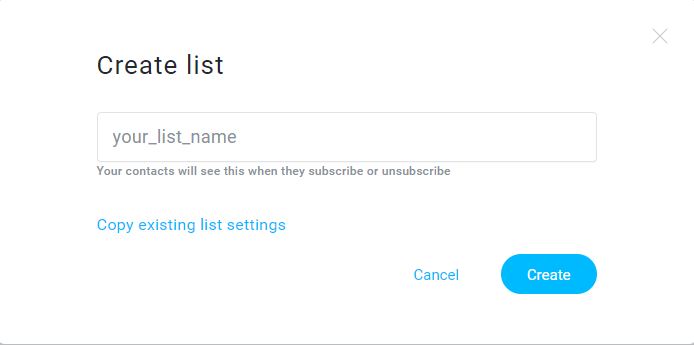
Give your list a name using the format in the list name column and hit the “Create” button.
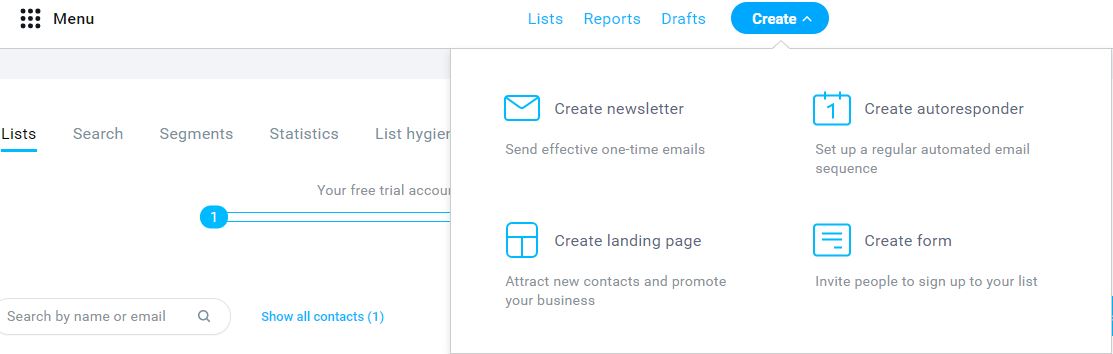
While on the new page, click the drop-down button on the create tab and select “Create Form”. Then, you will be taken to the “List Builder Wizard”.
For the next step, you will be required to select your preferred sign up form template. This is the template your visitors will sign up with, so choose a simple and sleek template.

Next, design your sign up form, you can do this using the drag and drop features.
Once you are through with the design, click on settings and select the list you wish to connect the form to and click “Save” and then click on the “Publish” button at the right-hand corner of the menu bar.

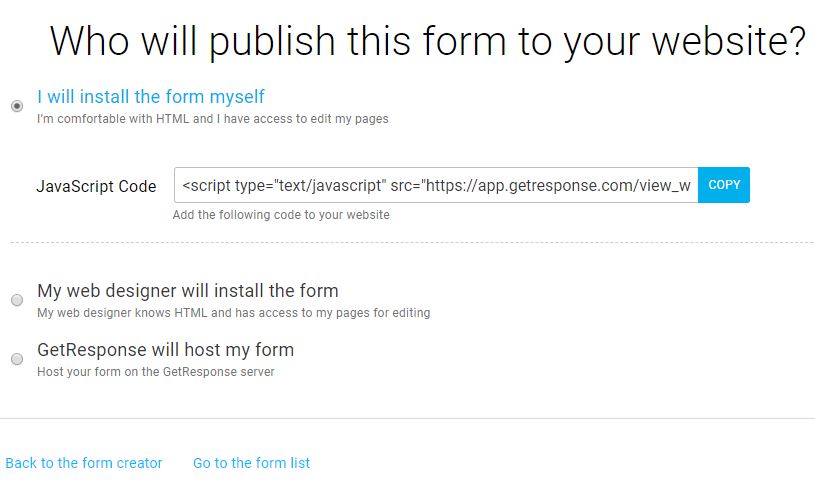
The next question you will be asked is “Who will publish this form to your website?”
If you want to receive a URL that will enable you to share your content to various platforms, select “GetResponse will host my form”.
If you have a functional blog or website where you want to place the form, select “I will install the form myself”.
Congratulations! you have now successfully created your first email list.
For the next stage, you will need to craft the welcome message that your email subscribers will receive when they sign up for your newsletter.
To start, go back to the “Create” tab and this time, select “Create Autoresponder”.
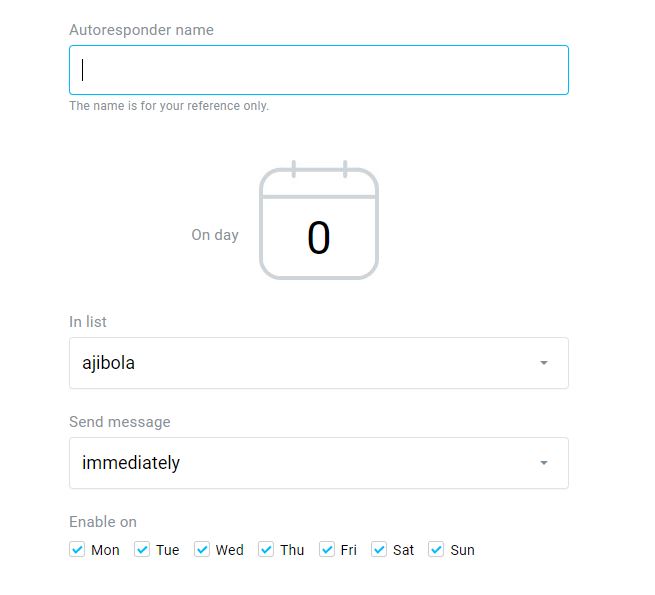
Type in a name for your autoresponder, and select a list.
In the “On Day” section, type in zero, this way, new subscribers will receive the welcome message and any other type of offer that comes with the subscription immediately they opt-in.
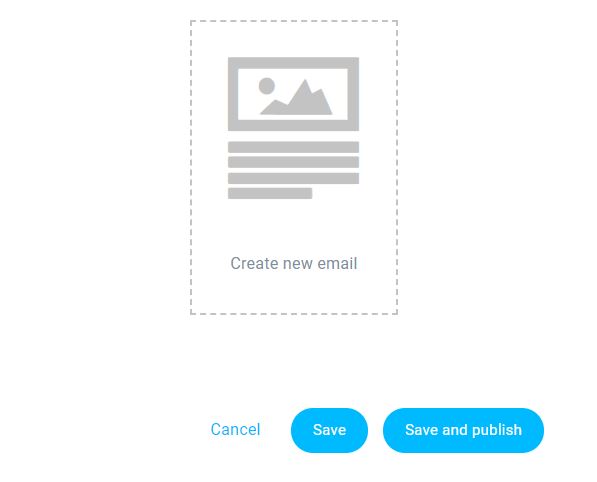
The next step is to scroll down the page and click on “Create New Email”
Then fill out the fields for “Message Name”, “Subject” and “From” under the Autoresponder Settings.
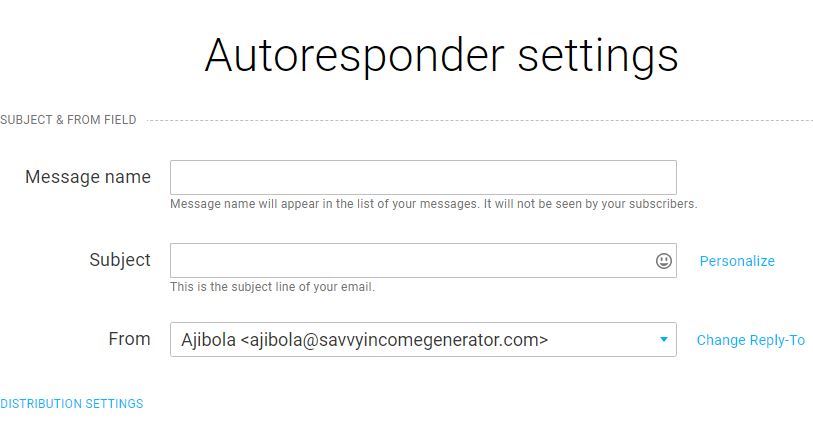
The “From” refers to your name and email address.
Having a private email address is recommended if you intend to do email marketing the right way and reduce the chances of your emails entering the spam folder of your leads.
So if you have a public email address such as gmail.com, yahoo.com, or hotmail.com, then my advice is that you should sign up for a private email.
Once all the relevant fields have been appropriately entered, click on “Next Step”.
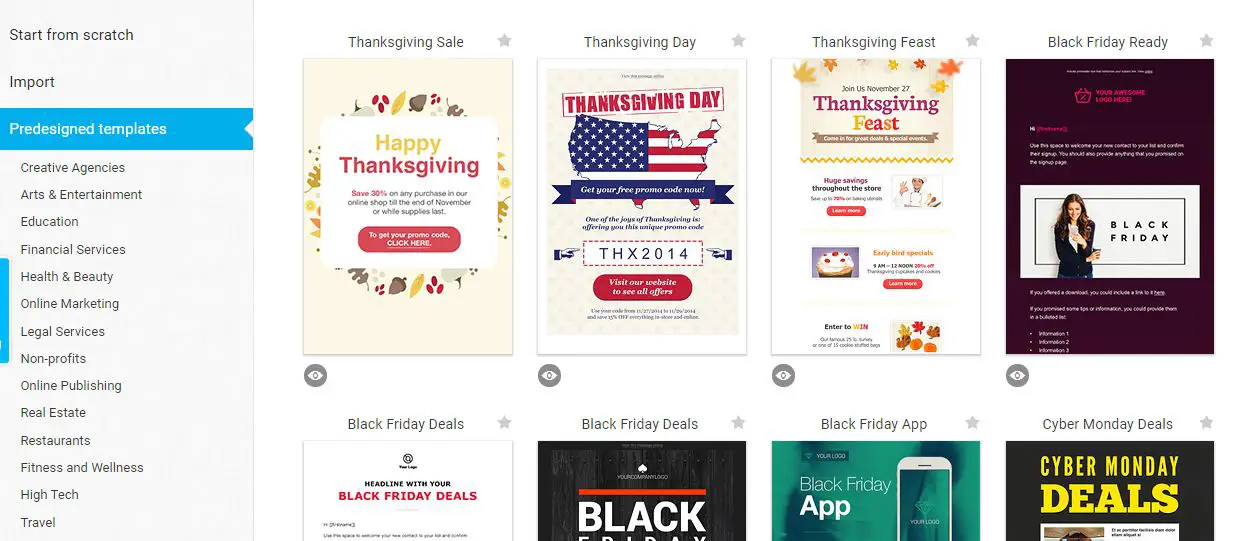
Select a template and enter your message, you can choose a pre-designed template or design one yourself by clicking on “Start from scratch”.
Click on “Next step” when you are done with the message.
Finally, click on “Save and publish”.
You can always create and add more autoresponder messages to the first one just by following these steps. This way, your subscribers will always receive your emails as designated.
Conclusion
If you have an online business offering products and/or services, then you should definitely create your own email list.
It can be challenging to build your email list and convert leads to customers but it is something you have to do if you want to get more customers and grow your business.
Moreover, the impact of a successful email marketing campaign far outweighs the cost of building up your email list.